Conda
Conda is an open source package management system and environment management system that helps to find and install packages. It was created for Python programs, but it can package and distribute software for any language, allowing for existence of completely separate and mutually conflicting environments that can be loaded/unloaded as necessary.
Distributions
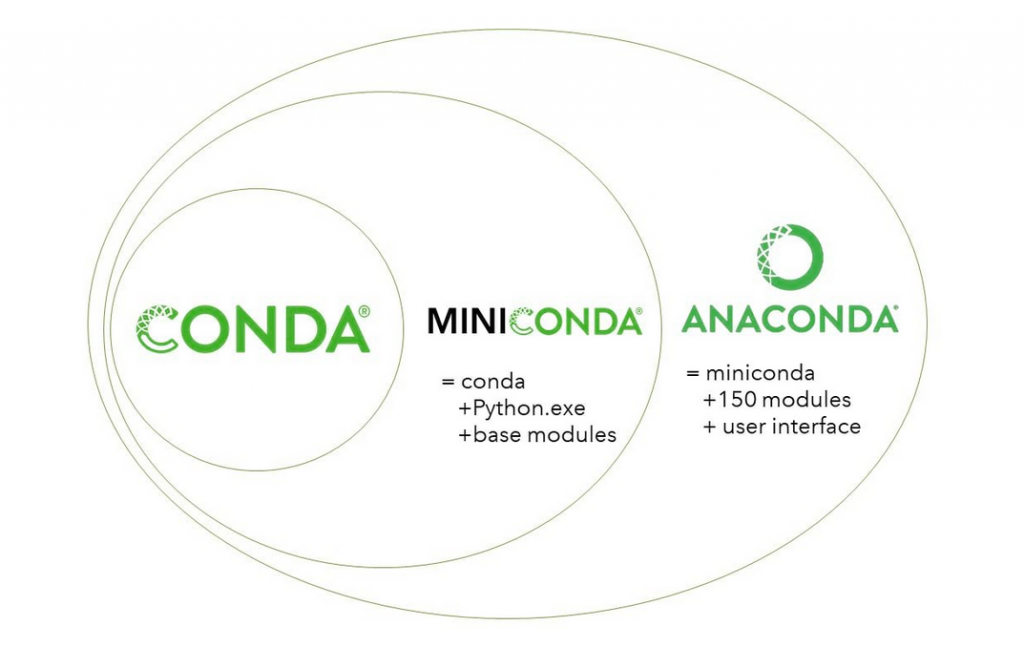
Conda package manager is also distributed with the Miniconda and Anaconda distributions. Miniconda contains the bare minimum packages for the conda package manager to work, and Anaconda contains multiple commonly used packages and a graphical user interface, see Figure below.

Miniconda Installation
A complete guide regarding Miniconda installation can be found in the official documentation. To install Miniconda into ~/miniconda3 download the latest miniconda3 installer:
login01:~ $ mkdir -p ~/miniconda3
login01:~ $ wget https://repo.anaconda.com/miniconda/Miniconda3-latest-Linux-x86_64.sh -O ~/miniconda3/miniconda.sh
login01:~ $ bash ~/miniconda3/miniconda.sh -b -u -p ~/miniconda3
After installation initialize conda:
login01:~ $ /miniconda3/bin/conda init bash
Conda channels
Conda channels are the locations where conda packages are stored. By default, packages are automatically downloaded and updated from the default channel, but other channels (i.e., conda-forge) can be specified using the --channel flag:
login01:~ $ conda install <package> --channel conda-forge
Managing environments
Conda allows you to create isolated environments for different projects or tasks. To create a new environment named myenv run:
login01:~ $ conda create --name myenv
To activate/deactivate the environment use:
login01:~ $ conda activate myenv
login01:~ $ conda deactivate myenv
Alternatively, conda environment can be created based on an environment definition file. Typically, the environment name is stated in the first line of the environment.yml file, but it can be named other things as long as you specify the file name in the command using the -f flag. For example, the following command will create a conda environment that is defined in a file called my-env.yml:
login01:~ $ conda env create -f my-env.yml
Creating environment from YAML file can be beneficial when sharing conda environments with others, making it easier to collaborate on projects or reproduce specific software setups.
To see a list of all of your environments, in your terminal window, run:
login01:~ $ conda info --envs
To remove an environment, in your terminal window, run:
login01:~ $ conda remove --name myenv --all
To verify that the environment was removed, in your terminal window, run:
login01:~ $ conda info --envs
Sharing conda environment
With conda, you can export the environment to a YAML file that contains a list of all the packages and their versions. Open the terminal or command prompt, activate the environment you want to share, and use the following command:
login01:~ $ conda env export > my-env.yml
Once you have the my-env.yml file, you can share it with others. The my-env.yml file contains information about the dependencies required for the environment, including packages, versions, and channels. To create an identical environment, the other person can use the following command in their terminal or command prompt:
login01:~ $ conda env create -f my-env.yml
If your environment relies on packages from specific channels other than the defaults, then you might need to add those channels using:
login01:~ $ conda config --add channels <channel-name>
Installing packages
You can install packages into a previously created environment. To do this, you can either activate the environment you want to modify or specify the environment name on the command line:
# via environment activation
login01:~ $ conda activate myenvironment
login01:~ $ conda install matplotlib

# via command line option
login01:~ $ conda install --name my-env matplotlib
To see a list of all packages installed in a specific environment:
# If the environment is not active
login01:~ $ conda list -n myenv

# If the environment is active
login01:~ $ conda list

# To see if a specific package is installed in an environment
login01:~ $ conda list -n myenv <package>
Base environment
The Python packaging system is prone to develop incompatibilities over time; the more packages you install into one conda environment, the more complex the dependency graph gets, which makes the default base environment prone to problems and breakage each time another package is installed.
For this reason, it is highly recommended to utilize separate conda environments for each project/purpose in order to mitigate the dependency management issues of the Python packaging system and to keep project dependencies as separate and simple as possible.
Using conda in sumbission scripts
Since all computationally heavy operations must be performed on compute nodes, Conda environments are can also be used in jobs submitted through SLURM scheduler:
Conda submission script
#!/bin/bash
#SBATCH -J "sample_job"     # name of job in SLURM
#SBATCH --account=<project> # project number
#SBATCH --partition=short   # select partition short, medium, long, ngpu
#SBATCH --nodes=        # number of nodes
#SBATCH --ntasks=       # number of mpi ranks, needs to be tested for the best performance
#SBATCH --cpus-per-task=    # number of cpus per mpi rank, needs to be tested for the best performance
#SBATCH --time=hh:mm:ss     # time limit for a job
#SBATCH -o stdout.%J.out    # standard output
#SBATCH -e stderr.%J.out    # error output

echo "Launched at $(date)"
echo "Job ID: ${SLURM_JOBID}"
echo "Node list: ${SLURM_NODELIST}"
echo "Submit dir.: ${SLURM_SUBMIT_DIR}"
echo "Numb. of cores: ${SLURM_CPUS_PER_TASK}"

conda activate myenv

# Continue with your code ...

# Example
export SRUN_CPUS_PER_TASK="${SLURM_CPUS_PER_TASK}"
export OMP_NUM_THREADS=1

srun ...
Cleaning up package data
The Conda environment managers download and store a sizable amount of data to provided packages to the various environments. These consume space and count towards your /home quotas. Since Conda packages are self managed, you need to clean unused data yourself:
conda clean -all
Which opens up an interactive dialogue with details about the operations performed. You can follow the default option, unless you have manually edited any files in you package data directory.